Simplifying Kubernetes Service Access with OpenVPN - A Complete Production Guide
Hey, Y'all 👋 Kratik Here :)
Hailing from The City of Lakes, India.
I love to learn and share stuff about DevOps, SRE, Security, Cost Optimization, etc.
Join me on this journey where we will learn together with the help bunch of interesting blogs.
Howdy, folks!
I have a question for you, How do you expose your Kubernetes services(or pods sometimes) outside your cluster?
Just to clarify*, I am not talking about making these objects public/internet-facing, otherwise, we will end up making everything in our cluster public, which is not a good choice at all.*
One option could be kubectl port-forward , see documentation here. It works well but I can see various cons to it, such as :
Need to run a command to expose and then need to keep the terminal session open.
You need to assign one local port for the port-forwarding, in some cases which can create conflict with other networking tools or apps.
You need to run
kubectl port-forwardcommand, which means you need access and authorization of the Kube API server but suppose you don't want your devs to give kubectl access, then how would they test their apps privately or check monitoring/logging/APM dashboards?If your machine is not configured properly, it can potentially expose the Kubernetes resources to the internet if the connection is not secured properly. This can result in unauthorized access or data breaches.
The
port-forwardcommand is not designed for high traffic or load. It is primarily intended for debugging or testing purposes, and may not be able to handle large amounts of traffic or requests.The
port-forwardcommand creates a direct connection between your local machine and the Kubernetes resource, which can tie up resources and affect performance, especially if multiple users are using the same connection.
Hmm... Now It seems so bad, so what do we have here, which can help us to mitigate these pain points?

OpenVPN for the rescue!

Yes, you heard right and this is what this blog is all about us using OpenVPN in our environments to deal with the problems listed above. But let's Start from the basics.
What is VPN?
VPN stands for Virtual Private Network*. It is a technology that allows users to connect to a private network over the internet securely. VPNs create a secure and encrypted connection between the user's device and the private network, which can be located anywhere in the world.*
Remote Access VPN :
A Remote Access VPN (Virtual Private Network) is a type of VPN that allows users to securely access a private network from a remote location over the internet. It is designed to provide secure connectivity for remote workers who need access to company resources from outside the office network, such as files, applications, or databases.
With a Remote Access VPN, users can connect to the company network as if they were physically present in the office, by creating a secure and encrypted connection between their device and the company's VPN gateway. This connection can be established using a variety of VPN protocols, such as OpenVPN, PPTP, L2TP/IPSec, and SSTP.
Remote Access VPNs are typically used by companies to provide secure access to corporate resources for employees who work remotely or travel frequently. They can also be used by individual users to access their home network or to connect to a public Wi-Fi hotspot securely.
I hope these basic definitions clear your basics and help you to understand the next part of the blog.
What is OpenVPN?
OpenVPN is an open-source VPN protocol that provides secure and private connections over the Internet. It is one of the most widely used VPN protocols due to its flexibility, security, and ease of use.
What will we achieve by installing OpenVPN in a Kubernetes Cluster?
Once we are done with the setup, We can access Kubernetes endpoints directly, for example -
Pod IP Addresses
K8s Service FQDN
K8s Service IP
Bonus! - You can also access your VPC resources by using private IPs provided by your cloud.
So that way only authorized personnel can access your private services w/o making any of those public.

Let's Start 🏃🏻♂️

Requirements
A Kubernetes cluster, preferably on a cloud like AWS, GCP, Azure, etc. If you are on an on-prem bare-metal cluster or a local one, you can use MetalLB. (check this example for minikube)
Todo - add more
Step-by-Step Guide
FYI - We are running a self-hosted K8s cluster using kOps on AWS.
OpenVPN in a Container
To Understand how OpenVPN works in a container(or in general), let's observe some popular Dockerfiles available on GitHub:
https://github.com/jfelten/openvpn-docker/blob/master/Dockerfile
https://github.com/kylemanna/docker-openvpn/blob/master/Dockerfile
Basic flow of OpenVPN Dockerfile:
Pick a base image *(*alpine recommended)
Install OpenVPN with all other required binaries - OpenSSL, iptables, easy-rsa(for automatic cert generation and CA setup process), google-authenticator(for OTP support)
Add some scripts where the code for setting up the OpenVPN server along with Cert generation resides.
Define
/etc/openvpnas VOLUME so make it persistent later on.EXPOSE some ports, e.g. 1194/UDP for OpenVPN
Add CMD instructions to run those scripts so that whenever our container starts it will setup everything up to run an OpenVPN server.
As things are running in containers with no manual intervention, we need to automate all of the setup processes. If you are doing it manually, you can follow this official guide. In this, we use a binary called easyrsa , which is a CLI utility to build and manage a PKI CA.
Commonly Used Commands(and terms):
easyrsa init-pki: Initialises your PKI.easyrsa build-ca: command to create theca.crtandca.key. Argnopasscan be used to disable password locking the CA.easyrsa gen-dh: generates DH parameters used during the TLS handshake with connecting clients. DH (Diffie-Hellman) parameters are generated using a mathematical algorithm that involves the selection of a large prime number and a generator value. The prime number and generator are used to perform a series of mathematical calculations that generate the DH parameters. Caution! - It can be a little time taking.openvpn --genkey --secret SECRET_NAME.keygenerates a secret key on the server.easyrsa build-server-full: Builds a server certificate and key. You also need to pass the server's common name used in the certs.easyrsa gen-crl: Generates the CRL(Certificate Revocation List - a list of digital certificates that have been revoked) for client/server certificates revocation./dev/net/tun: The/dev/net/tundirectory in Linux is a virtual device file that represents a network tunneling device called TUN (network TUNnel). TUN is a software interface that allows users to create virtual network devices that can be used to tunnel network traffic over a network connection.mknod: creates a device file in the file system. More info on mknod is here.
How all these are bundled in the Helm Chart?
As we are ultimately going to deploy all this on Kubernetes, we need to understand how the automation is set up.
Repo Link: https://github.com/k4kratik/k8s-openvpn/tree/master/deploy/openvpn
While Deploying OpenVPN on Kubernetes, All the scripts are configured in config-openvpn.yaml ConfigMap. The scripts are mounted in the running pod. Those scripts are:
setup-certs.sh: This will set up CA and other components(dh params, ta.key, crl) for OpenVPN using the easy-rsa utility.newClientCert.sh: Used for generating config files for OpenVPN clients.revokeClientCert.sh: To revoke any existing certificates.configure.sh: This is the entrypoint script located at/etc/openvpn/setup/configure.sh
Values.yaml file
below we are mentioning some values which you should consider changing as per your cluster setup. Also, it is good to know what they do.
OVPN_K8S_POD_NETWORK: Kubernetes pod network IPOVPN_K8S_POD_SUBNET: CIDR Range for Pod networkOVPN_K8S_SVC_NETWORK: Kubernetes Service network IPOVPN_K8S_SVC_SUBNET: CIDR Range for K8s Service network
serverConf: To append additional config to the server configuration file.
example :
    serverConf: |
      push "route 172.22.0.0 255.255.0.0"
      push "route 169.254.20.10 255.255.255.255"
      duplicate-cn
here
172.22.0.0is the IP of our VPC Network which255.255.0.0is the subnet mask. (172.22.0.0/16) We want all the traffic for VPC's Subnet IPs to go via the OpenVPN server. (this will give us the power to access AWS resources via Private IPs😎)here
169.254.20.10is for Node-local-dns (an addon that we are using.)duplicate-cnis for allowing the same client to connect more than once.
Deploy Helm Chart
I am assuming you have made changes in the values.yaml file as per your requirements.
# clone the repo
git clone https://github.com/k4kratik/k8s-openvpn.git

cd k8s-openvpn/deploy/openvpn/

helm upgrade --install openvpn ./ -n k8s-openvpn  -f values.yaml --create-namespace
It will create the deployment and a LoadBalancer type service. You can tail logs to see what's happening.
⚠️ Generation of DH params can take 5-10 mins.
When the pod is successfully set up and LB is up for your OpenVPN service you can move to the next part.

Create our first OpenVPN user
cd to manage dir and run the below command:
cd k8s-openvpn/manage/
bash create_user.sh opevpn-user-1
It will give you a file with your config and certs embedded.
See VPN in action!
Now, you have a client file, use any OpenVPN-supported client(e.g. TunnelBlick), connect using it, and see if you can connect or not.
\"Tunnelblick mode - Do not set nameserver" - START**
Note! - select Do Not Set Nameserver in the Tunnelblick config of your VPN profile.
Disclaimer - You do not need to do the above step but to show you one more alternative and to show how things work internally, for the sake of this tutorial let's move on as stated.

Add NGINX pod and NGINX service quickly to our cluster to test our VPN:
kubectl run nginx --image nginx:alpine
kubectl expose po nginx --port 80
Keep your fingers crossed 🤞🏻 : open Chrome and enter the ClusterIP of your NGINX service.

Woohoo! It worked! 🥳 🥳 🥳
Testing the K8s-specific DNS
According to Official Guide, Let's form our DNS, which is an A Record, which should be mapped to the IP of the service.
http://nginx.default.svc.cluster.local
here:
nginx -> name of service
default -> name of the namespace
svc -> represents k8s svc
cluster.local -> your clusterDomain
So, Let's try:

wait, what? Why did it fail? 😭
Answer
There is no mechanism available for resolving those Kubernetes FQDNs, although if you are in k8s networking(in a pod), it will be resolved as you are on an external network on your PC, you need something in between to do the magic for you!
Kube-DNS to the rescue!
Logic 🤔 : Currently we are able to connect to the K8s network by using IPs with the help of our VPN server. There is a service already running in our cluster called kube-dns if we ask this service to resolve those FQDNs, it will resolve it.
So we will use another bundled script called domain-fix.sh and make sure you have everything defined there correctly.
run that script and it will create a file named svc.cluster.local in /etc/resolver dir. and this file will have the IP of kube-dns as a nameserver.
So all our cluster DNS queries as above will use kube-dns as the nameserver.
cd k8s-openvpn/manage/
bash domain-fix.sh
Let's Try Again

🎉 🥳 🎉 🥳 🎉 🥳
but how? Let's observe the newly created file /etc/resolver/svc.cluster.local
cat /etc/resolver/svc.cluster.local

# output
domain svc.cluster.local
nameserver 100.76.0.10 # IP of kube-dns svc
Here is a rough diagram explaining the flow:

\"Tunnelblick mode - Do not set nameserver" - END**
Remember we added a disclaimer regarding how you need to select Do Not Set Nameserver , Now, if you got the understanding, you can select Set Nameserver in Tunnelblick and w/o the need of running the domain-fix.sh the script you can see k8s FQDNs working fine in your browser.
Revoking a user
Suppose one person left your team and now you want to revoke that person's certificate.
Note! - here CERT_NAME is the common_name you used when generating the certificate.
cd k8s-openvpn/manage/
bash revoke_user.sh CERT_NAME
A note on k8s pod's /etc/resolv.conf
In Kubernetes, the /etc/resolv.conf file in a pod is populated with the DNS configuration specified in the cluster-wide DNS policy. This configuration is typically set up by the cluster administrator and can vary depending on the cluster's networking configuration.
The cluster-wide DNS policy is specified in the kubelet configuration file on each node in the cluster. This policy specifies the DNS server IP addresses and search domains that should be used for name resolution in the cluster.
When a pod is created, the kubelet on the node where the pod is scheduled creates a symlink from /etc/resolv.conf in the pod's network namespace to a file in the host filesystem that contains the DNS configuration specified in the kubelet configuration file.
$ kubectl exec -it YOUR_POD_NAME -- cat /etc/resolv.conf

# output
Defaulted container "openvpn" out of: openvpn, sysctl (init)
search default.svc.cluster.local svc.cluster.local cluster.local ap-south-1.compute.internal
nameserver 169.254.20.10
options ndots:5
How does OpenVPN make the clients use it for certain domains?
By default, the OpenVPN server does not set the DHCP options for the clients. In our config, we use dhcp-option DOMAIN-SEARCH to achieve this kind of behavior.
dhcp-option DOMAIN-SEARCH is a DHCP option that specifies the DNS search domain that the DHCP client should use for name resolution. When a client receives this option, it adds the specified domain name to its list of DNS search domains.
a note on config generation
Suppose an OpenVPN server started and now it's bootstrapping itself and generating the OpenVPN config file. Script name - configure.sh in config-openvpn.yaml ConfigMap.
note the below part in the script :
      SEARCH=$(cat /etc/resolv.conf | grep -v '^#' | grep search | awk '{$1=""; print $0}')
      FORMATTED_SEARCH=""
      for DOMAIN in $SEARCH; do
        FORMATTED_SEARCH="${FORMATTED_SEARCH}push \"dhcp-option DOMAIN-SEARCH ${DOMAIN}\"\n"
      done
      cp -f /etc/openvpn/setup/openvpn.conf /etc/openvpn/
      sed 's|OVPN_K8S_SEARCH|'"${FORMATTED_SEARCH}"'|' -i /etc/openvpn/openvpn.conf
I tried to get the value of SEARCH variable and it came out as:
openvpn-6779bdf87f-r85q2:/# SEARCH=$(cat /etc/resolv.conf | grep -v '^#' | grep search | awk '{$1=""; print $0}')

openvpn-6779bdf87f-r85q2:/# echo $SEARCH
# output
default.svc.cluster.local svc.cluster.local cluster.local ap-south-1.compute.internal
So Now I think you can understand, from Pod's /etc/resolv.conf file, it gets the list of domains for DOMAIN-SEARCH DHCP-option and adds these to the config file for the OpenVPN Server and now whenever clients connect, for these domains their traffic goes via OpenVPN and thus, able to connect to the k8s network.

Considerations
Your AWS SG rule should allow access to your desired ports if you are accessing AWS VPC resources.
- Tip! - We have added a rule for the ephemeral ports range for the NodePort services (30000-32768) and only the VPC Subnet CIDR is allowed.
Here we are using
CN=serverandCN=clientfor the server conf and client conf respectively.We are using
EASYRSA_BATCH=1in our scripts so it doesn't ask/wait for user inputs in prompts.We are using
remote-cert-tlsto mitigate MITM attacks.
Bonus! - OpenVPN Monitor
We came across an amazing project called OpenVPN Monitor It gives you a GUI to see the list of all connected clients with some more info.
for that, you need to add the below line in the OpenVPN config:
management 0.0.0.0 5555
This will expose port 5555 on the OpenVPN pod to listen for incoming management client requests.
Our helm chart is already configured for this, make sure you supply appropriate values.
Steps
# clone the repo
git clone https://github.com/furlongm/openvpn-monitor
cd openvpn-monitor

# copy the config and make sure you replace the host1 in VPN1
cp openvpn-monitor.conf.example openvpn-monitor.conf

# create a virtual env for python
python3.8 -m venv openvpn

# activate it
source ./openvpn/bin/activate

# install the dependency
pip install -r requirements.txt

# install gunicorn
pip install gunicorn

# run the server
gunicorn openvpn-monitor -b 0.0.0.0:31001
Now you can open your browser and have a look at the cool console with data provided by the OpenVPN server.
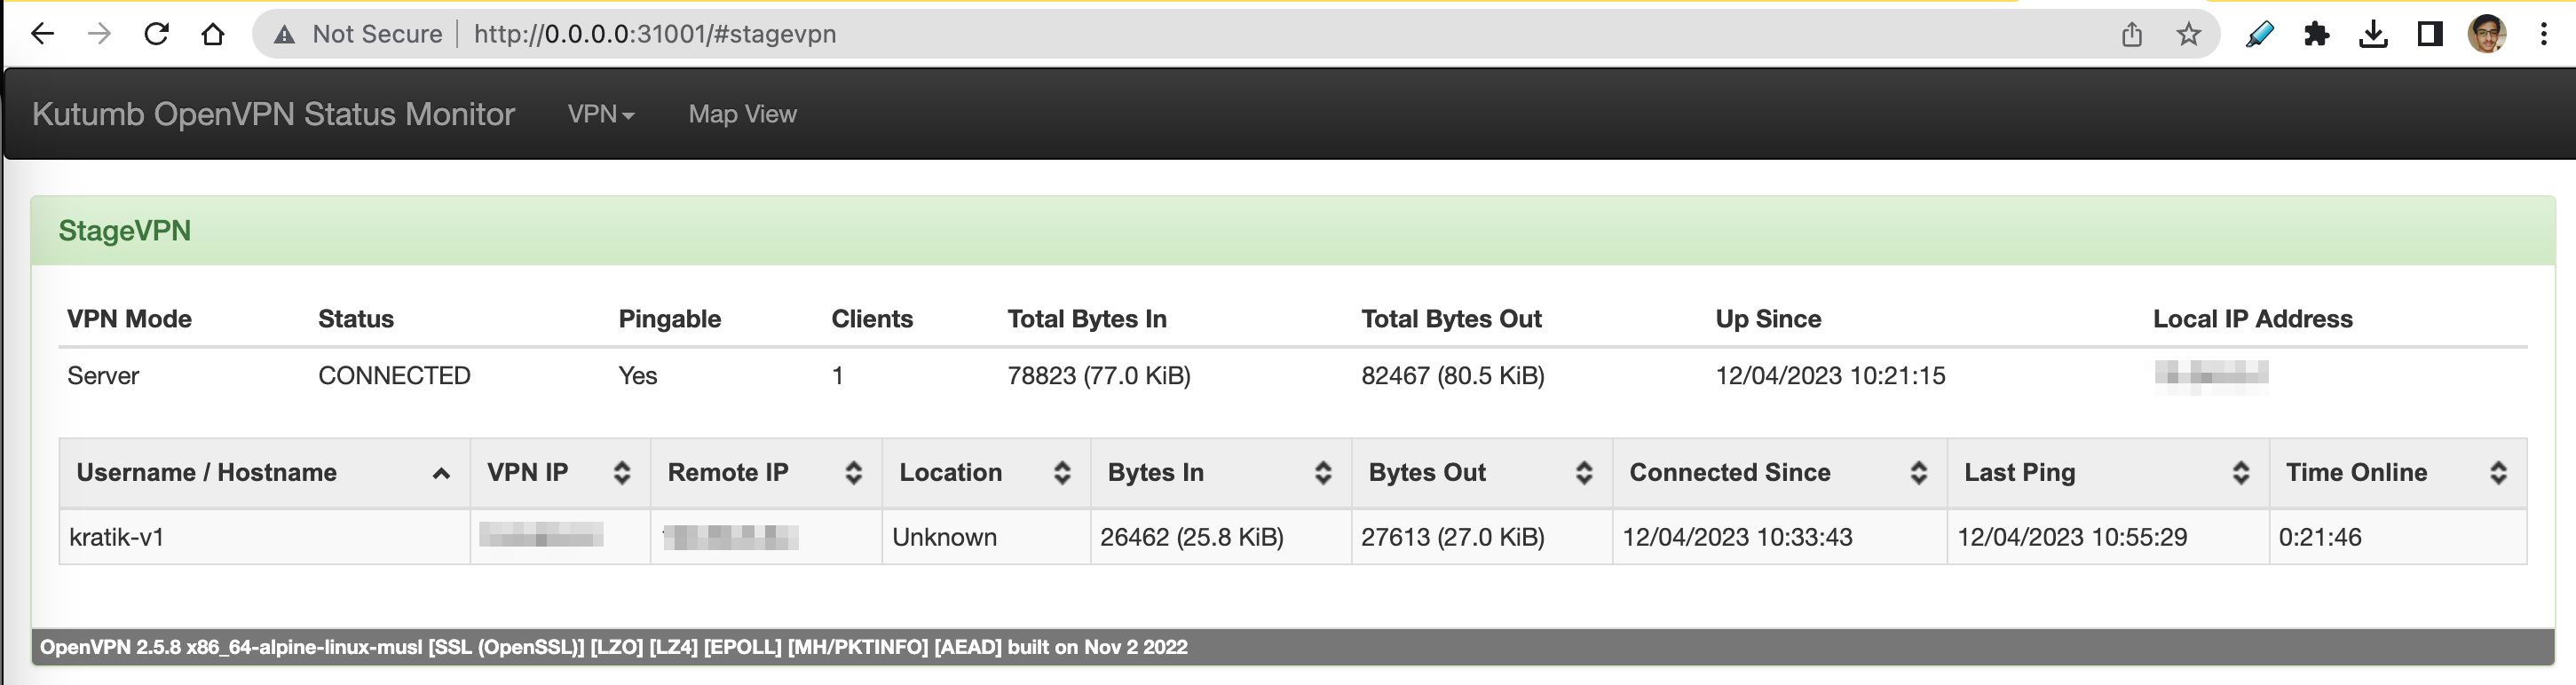
Possibilities are limitless - you can also bundle this tool as part of our helm chart and run it in the same cluster.

🥳 Shout Out to Harshit @ Kutumb for setting this up in the very first place!
References:
https://community.openvpn.net/openvpn/wiki/EasyRSA3-OpenVPN-Howto
https://openvpn.net/community-resources/setting-up-your-own-certificate-authority-ca/
https://levelup.gitconnected.com/setup-openvpn-access-server-on-kubernetes-bdc35ca6b6c5
https://blog.opstree.com/2023/02/21/split-tunneling-using-openvpn/#more-12945
https://openvpn.net/community-resources/management-interface/